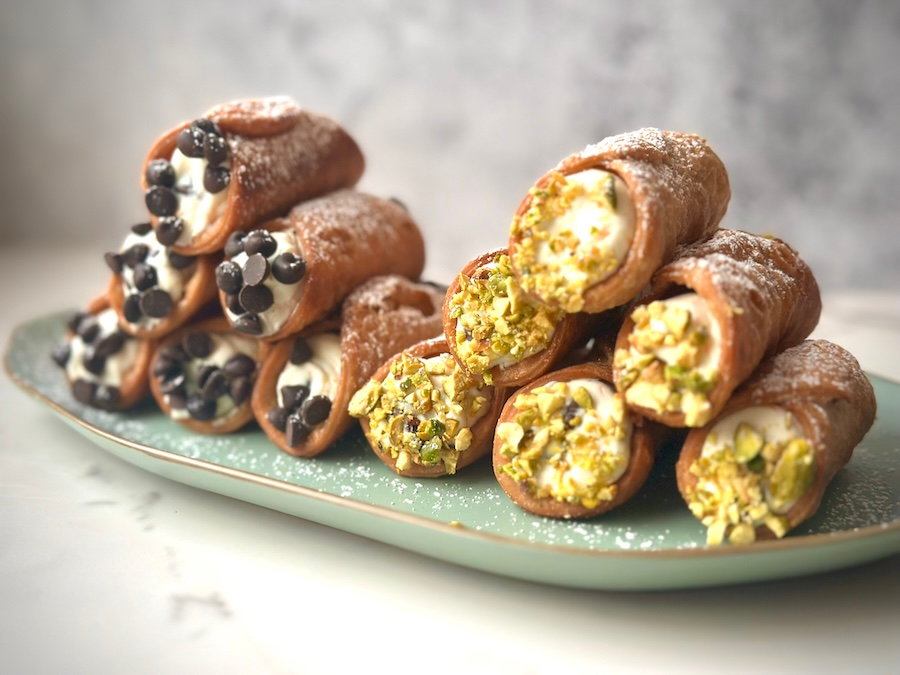
The secret to a world-class cannolo lies in a violent contrast of textures: a shatteringly crisp, bubbly shell and a velvety, chilled ricotta centre. This recipe moves beyond the basic to focus on the essential chemistry of the dough; we utilise the acidity of Marsala wine to lower the boiling point of the moisture, triggering the rapid steam expansion required for that signature “blistering” during the fry. By embracing the patience of hand-rolling the pastry and meticulously curing the ricotta to shed excess whey, you achieve a professional-grade result. The reward is a pastry with true structural integrity, one that holds its snap and delivers a sophisticated, balanced sweetness that defines the height of Sicilian patisserie.
Ingredients
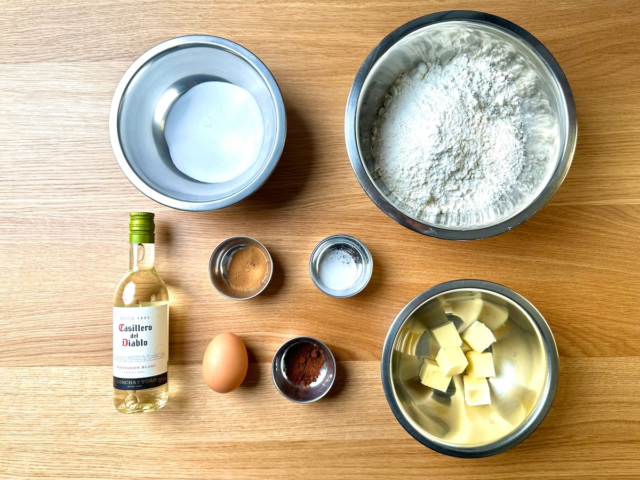
Cannoli Dough
-
Plain Flour (9-11% Protein) – The medium protein content provides the perfect structural balance, strong enough to hold the air bubbles (blisters) during frying, yet low enough to remain delicate.
-
Unsalted Butter – Adds richness and “shortens” the gluten strands, ensuring the shell shatters rather than snaps.
-
Caster Sugar – Provides a subtle sweetness and aids in the caramelisation and golden colour of the shell.
-
Egg Yolk – Acts as an emulsifier and adds fat, contributing to a supple dough and a richer, more golden finish.
-
Marsala Wine (or White Wine) – The most critical technical ingredient; the acidity tenderises the gluten, while the alcohol evaporates rapidly in the oil to create the signature blistered surface.
-
Cocoa Powder – Primarily used for its deep, earthy aesthetic and to provide the traditional dark, mahogany hue to the fried shell.
-
Ground Cinnamon & Salt – Cinnamon provides the classic warmth, while salt acts as a flavour enhancer to balance the sweetness of the filling.
-
Vanilla Paste – Introduces a concentrated, aromatic base note to the dough.

Ricotta Filling
-
Ricotta (Drained) – The foundation of the cannolo; using sheep’s milk ricotta is traditional, but regardless of the source, it must be drained for 24 hours to ensure a stable, pipeable texture.
-
Icing Sugar – Chosen for its fine texture, it dissolves instantly into the cold ricotta without any residual graininess.
-
Orange Zest – The essential oils provide a bright, citrus top note that cuts through the richness of the cheese.
-
Vanilla Paste – Adds visual “specks” of luxury and a deep floral aroma to the cream.
-
Chocolate Chips – Provides a necessary textural contrast within the velvety filling.
Garnish
-
Roasted Pistachios – Finely chopped to provide a vibrant green contrast and a toasted, nutty crunch to the ends.
-
Chocolate Chips – For a decadent finish that mirrors the interior filling.
-
Icing Sugar – A final, delicate dusting to provide a professional, “pasticceria” aesthetic.
All The Equipment You Need
Storing Cannoli
Room Temperature (Shells Only)
-
Shelf Life: Up to 7 days.
-
Method: Once the fried shells have cooled completely, store them in an airtight container lined with kitchen paper in a cool, dry pantry. Keeping them at room temperature is the only way to preserve the “shatter” of the blistered pastry.
-
Note: Never refrigerate empty shells; the atmospheric moisture will cause the delicate dough to become chewy and lose its structural snap.
Refrigeration (Filling Only)
-
Shelf Life: 3 to 5 days.
-
Method: Store the cured ricotta filling in a sealed piping bag or an airtight container with a piece of cling film pressed directly onto the surface to prevent a skin from forming.
-
Serving Tip: Refrigeration is essential for the filling to maintain its stability and “set.” For the best experience, pipe the chilled filling into the shells no more than 15–30 minutes before service. This ensures the contrast between the ice-cold, velvety cream and the room-temperature, crisp shell remains the focal point.
Assembly & Service
-
Shelf Life: 1-2 hours.
-
Method: Once assembled, the cannoli should be consumed almost immediately. The high moisture content of the ricotta will inevitably migrate into the pastry, eventually softening the shell.
-
Technical Note: If you are preparing for a large event, keep the shells and filling separate until the last possible moment. If the stored shells feel slightly soft due to humidity, you can re-crisp them in a 150°C oven for 3–5 minutes; ensure they are completely cold before filling.
Classic Cannoli: From Shell to Filling
Ingredients
Equipment
Method
- To ensure a stable, pipeable filling, line a fine-mesh strainer with cheesecloth and place it over a collection bowl. Transfer the ricotta to the cloth, wrap it tightly, and apply a steady weight, such as a bowl filled with dry rice, to press out the excess whey. Refrigerate and allow to drain for 24 hours to achieve a dense, concentrated curd that won't compromise the crispness of the shells.


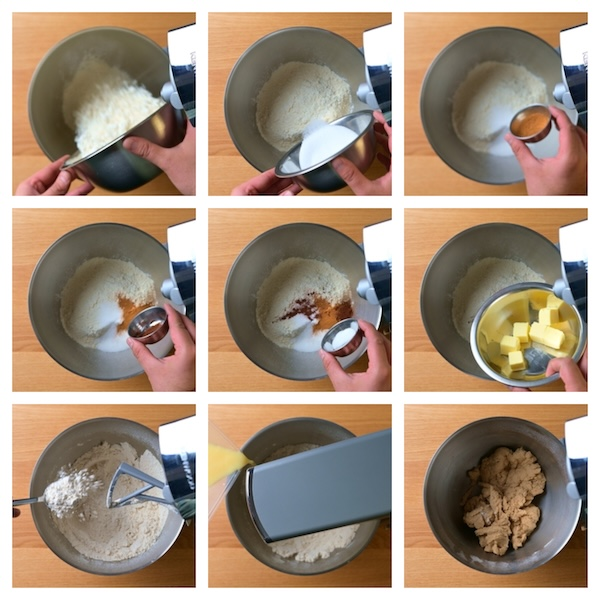
- In the bowl of a stand mixer fitted with the paddle attachment, combine the flour, chilled butter, sugar, cocoa powder, cinnamon, and salt. Mix on a low-medium speed until the fats are rubbed into the dry ingredients, achieving a uniform fine crumb texture. With the mixer still running, steadily introduce the emulsion of wine, egg yolk, and vanilla paste. Continue mixing until the dough comes together.

- Give the dough a quick 30 second knead on the worktop before pressing into a disc about 1 inch thick, wrapping it in cling film and placing into the fridge to chill and rest overnight.

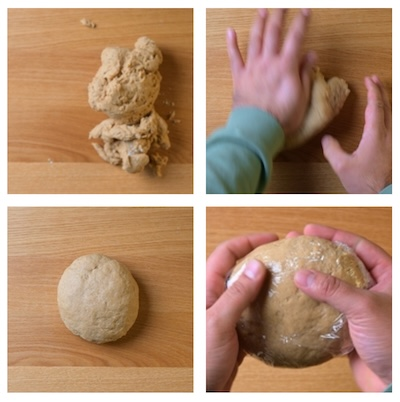
- The Next Day: Remove the dough from the fridge and let it rest at roo temperature for 30 minutes. Divide the dough into 4 pieces.

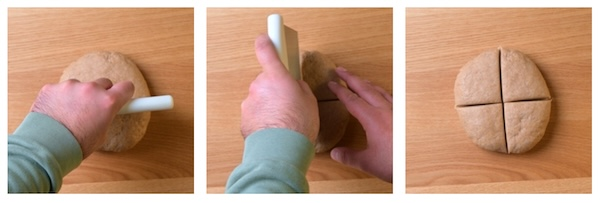
- On a lightly floured surface, roll each portion of dough as thin as possible, targeting a 1mm thickness. While you should flour the surface initially, allow the dough to naturally grip the worktop; this slight resistance provides the tension necessary to stretch the dough to its limit. Once the dough reaches maximum tension, lift it gently to release, then continue rolling until translucent and elastic.
- Once the dough is rolled to its limit, lift to release the final tension and stamp out circles using a 10cm cutter. Stack the discs on a tray, separating each layer with greaseproof paper to prevent sticking and dehydration while you finish the batch.

- Consolidate the remaining dough scraps into a ball and wrap them tightly. Allow the dough to rest for 30 minutes to relax the gluten network, making it pliable enough for a second rolling. Following this method, the batch should yield approximately 30 shells.


- Transfer the drained ricotta into a clean bowl and incorporate the icing sugar, vanilla paste, and fresh orange zest. Whisk the mixture until homogenous and silky, then gently fold through the chocolate chips to ensure even distribution without over-working the curd. Transfer the cream into a piping bag and refrigerate until chilled; this allows the flavours to mature and the structure to firm up for clean, professional piping.

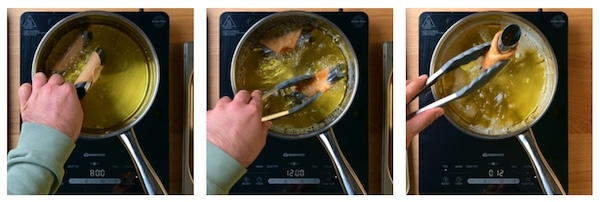
- Heat a neutral oil in a deep pan until it reaches 160°C (320°F).
- While the oil heats, begin preparing the dough discs. Take a single disc and give it a gentle, lateral stretch to create a slightly oval shape. Wrap the dough around the cannoli tube, ensuring it sits snugly. Using a small brush or your finger, apply a thin film of egg white to the edge of one side. Pull the opposite side over, creating a generous overlap of at least 1cm. Press firmly to fuse the layers.
- Carefully lower three or four tubes at a time into the hot oil to avoid overcrowding the pan. Using tongs, constantly rotate the tubes throughout the process; this ensures the dough cooks evenly on all sides and prevents one side from browning more than the rest. Fry for approximately 3 minutes until the shells have transformed into a deep, uniform golden-brown and the surface is covered in fine, crisp blisters.Once golden, remove the tubes from the oil and transfer them to a wire rack to cool completely. Continue to fry off the remaining prepared tubes.

- Once completely cooled gently squeeze the ends of the metal tube to slightly reduce its diameter and slide the shells of the tube. Repeat the process with the remaining raw dough discs until all 30 pieces are fried and ready for filling.


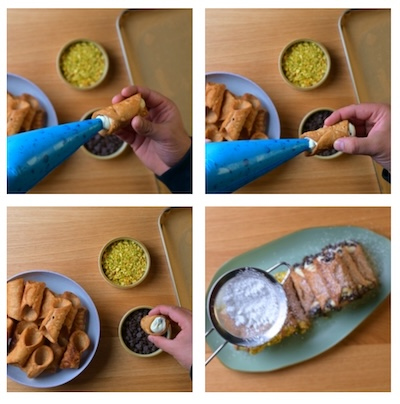
- To preserve the crispness of your hand-crafted shells, begin filling no more than 15 minutes before serving. Snip the tip of your piping bag and insert the nozzle deep into one end of the shell, piping steadily as you pull outwards. Repeat from the opposite end to ensure a solid, continuous core with no air pockets in the centre. Immediately dip the exposed cream ends into your choice of dark chocolate chips or vibrant chopped pistachios. Arrange the cannoli on a serving platter and finish with a generous dusting of icing sugar before enjoying

Notes
- Resting the dough is essential for relaxation and elasticity; while an overnight rest is the gold standard for a professional finish, ensure a minimum of 4 hours to prevent the shells from shrinking.
- Aim for a paper-thin 1mm thickness to ensure a delicate, shatteringly crisp result; using a pasta machine is the most efficient way to achieve this level of precision.
- Fried shells remain crisp for up to 7 days in an airtight container, while the filling lasts 3 days refrigerated; however, they must be assembled just before serving to prevent the pastry from softening.
- Keep the dough covered at all times to prevent it from drying out.