
There’s nothing more frustrating than putting time and effort into your dough, only for it to fall flat or prove inconsistently. Fluctuating room temperatures can be the bane of any baker’s existence, especially when working with sensitive sourdough or rich brioche. But what if there was a simple, effective way to ensure your dough rises perfectly every time? This post will show you how to build your own homemade dough prover, a game-changer that provides the consistent, warm environment vital for optimal yeast activity and gluten development, promising you beautifully risen, consistent bakes.
Why a Prover?
Yeast is highly sensitive to temperature; too cold, and it becomes sluggish; too hot, and it over-ferments or even dies. A consistent, warm environment allows yeast to thrive predictably, leading to a more even and robust rise. This controlled proving also contributes significantly to better flavour development and a desirable open, airy crumb structure in your finished bread.
What You’ll Need
Please note: Some of the links below are affiliate links. This means that if you click and make a purchase, I may receive a small commission at no extra cost to you. This helps support the content on this blog. Thank you!
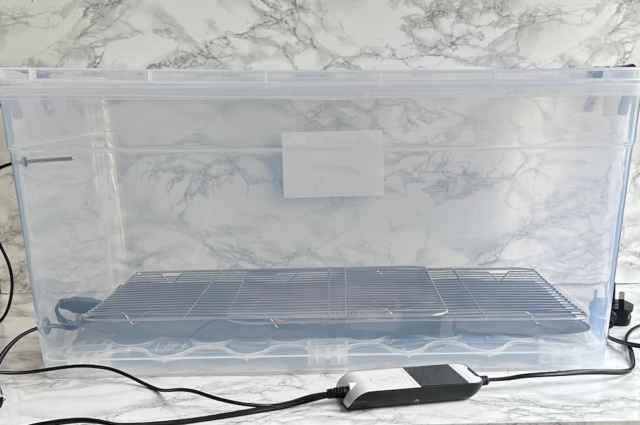
- Large Plastic Storage Container with Lid: Choose one large enough to comfortably fit your dough bowl(s) or banneton.
- Warming Mat: A seedling heat mat, or a low-wattage reptile mat, works perfectly to provide gentle, consistent heat.
- Wire Rack: An oven rack or cooling rack that fits inside the container, used to elevate your dough above the heat source.
- Small Bowl for Water (Optional): For adding extra humidity if your dough tends to dry out.
- Drill (and 14mm/6mm Drill Bits): For inserting the power cable and built in thermometer. Wood drill bits will work best.
Step-by-Step Construction
- Position Heat Mat: Place the warming mat inside the container to determine the best spot for its power cable to exit.
- Drill Cable Hole: Attach the 14mm drill bit and, in a corner closest to the power cable’s exit point, drill a hole near the bottom edge of the tub.
- Drill Thermometer Hole: Switch to the 6mm drill bit and drill a second hole towards the top corner of the tub, aligning it with where your thermometer’s probe will be inserted. Ideally in line with the power cable hole.
- Feed Cables: Carefully feed the warming mat’s power cable through the bottom hole and the thermometer’s probe through the top hole.

- Place Wire Rack: Position the wire rack inside the container, above the warming mat, to create a platform for your dough.

- Initial Test & Adjustment: Plug in the heat mat and monitor the temperature with your thermometer for an hour. Adjust the heat mat’s setting (if it has one) or add a folded towel under it to fine-tune the temperature to your desired range. You are now all set!

How to Use Your Prover
- Set Temperature: Aim for your desired proving temperature (e.g., 24-27°C / 75-80°F for most doughs).
- Prepare Dough: Place your dough (in a covered bowl or banneton) on the rack inside the prover.
- Humidity (Optional): If your dough seems to dry out, place a small bowl of warm water next to it. This shouldn’t be an issue if your dough is covered, the moisture in the dough will create a humid environment.
- Monitor: Keep an eye on the thermometer. Avoid opening the prover too frequently.
- Proving Time: Allow dough to prove until it passes the “poke test” or reaches desired volume.
Benefits & Final Thoughts
Now that you have a prover set up, I have no doubt the impact it will make on your creations. I believe the prover will help eliminate the struggles in controlling proves, leading to consistently perfect results and a superior crumb structure, speed up proving times and provide more control.
Why not build your own and experience the difference? Then, put it to the test with my ‘Super Soft White Bread’, ‘Rich and Buttery Brioche’ or my ‘Classic Sourdough Loaf’ to achieve consistently perfect results! Happy baking!
Note: This is a large piece of equipment, the container measures (L)67.5cm x (H)30cm x (W)44.5cm (26.5in x 12in x 17.5in). I find the smaller mats available do not allow you to set up the prover in the same way or are limited with the controls. When I am not using the prover it doubles up as storage for my baking trays and tins.