There’s something truly magical about baking sourdough bread. The process, the patience, and the living, breathing starter all culminate in a loaf that is utterly unique – a bread with a complex tangy flavour, a beautifully open crumb, and an undeniably satisfying, crackling crust. It’s more than just baking; it’s a journey into the heart of traditional bread making.
My recipe for a Classic Crusty Sourdough Loaf is designed to demystify this rewarding process, guiding you towards achieving that coveted artisan quality in your own kitchen. We’ll focus on the essential steps and techniques that ensure a well-developed flavour, an airy interior, and that perfect, deeply golden crust that sings as it cools.
In this post, I’ll walk you through every stage, from feeding your starter to the final bake. Get ready to embrace the rhythm of sourdough and create a loaf that’s not just delicious, but a testament to your baking prowess!
Ingredients
- Bread Flour – Bread flour forms the primary structure of this sourdough, chosen for its high protein content (typically 12-14%). This robust protein level is essential for developing the strong, elastic gluten network needed to trap the gases produced by the levain, resulting in a well-risen loaf with a desirable open and chewy crumb. For more on gluten read ‘The Secret Life of Flour’
- Wholemeal Flour – Or whole wheat flour adds depth of flavour, nutritional value, and contributes to the rustic character of the sourdough. Its bran and germ content provide a more complex, nutty taste and a slightly denser crumb, while also offering additional food for the levain, aiding in fermentation.
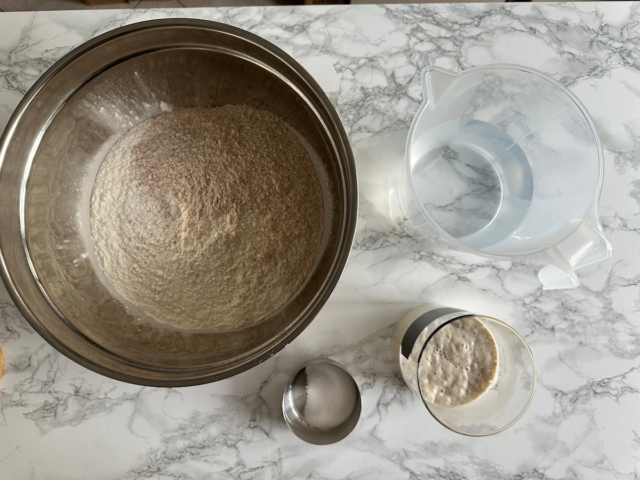
- Levain – The Levain is the heart and soul of sourdough, acting as the sole leavening agent. This active, bubbly starter, a fermented mixture of flour and water, provides the wild yeasts and beneficial bacteria necessary to ferment the dough, creating its characteristic tangy flavour, open crumb structure, and impressive rise.
- Water – is a critical component in sourdough, not just for hydration but for activating the gluten and facilitating fermentation. It allows the flour proteins to form gluten, helps the levain distribute evenly, and is essential for the enzymatic reactions that break down starches, contributing to the bread’s flavour and texture.
- Salt – is indispensable in sourdough for both flavour and dough management. It enhances the bread’s complex taste profile, balances the tanginess from the fermentation, and crucially, helps to regulate yeast activity and strengthen the gluten network, leading to a more manageable dough and improved crumb structure.
Sourdough Success: Top Tips for Your Loaf
Baking sourdough is a rewarding journey that builds confidence with practice. While the process appears lengthy, the hands-on time is surprisingly minimal – often around an hour in total. Don’t be disheartened by early attempts; it’s a learning curve! Even if a loaf doesn’t look perfect, it will almost certainly taste fantastic.
Here are some key tips to guide you:
- Quality Flour Matters: Invest in good quality bread flour. In the UK, I highly recommend Wessex Mill’s Bread Flour (13% Protein) for its consistent performance (available online). For those in the US, King Arthur Bread Flour is a widely trusted and readily available option. Research and test what’s available locally; finding the right flour makes a significant difference.
- Wholemeal Flour Flexibility: I’ve included wholemeal flour in this recipe for its depth of flavour. However, you can substitute it entirely with white bread flour. If you do, remember to adjust your hydration: reduce the water amount to 630g, which will give you approximately 65% hydration (this recipe is at 70%). For a deeper dive into hydration and its impact read my ‘Mastering Dough Hydration: The Key to Perfect Texture’
- Maintain a Healthy Starter: Your sourdough starter is the living heart of your bread. Keeping it healthy and active is paramount for a successful bake. Learn more about how to build and maintain your starter in my dedicated guide here.
- Trust the Process: Sourdough requires patience and observation. Understand the stages and trust that the dough will do its work.
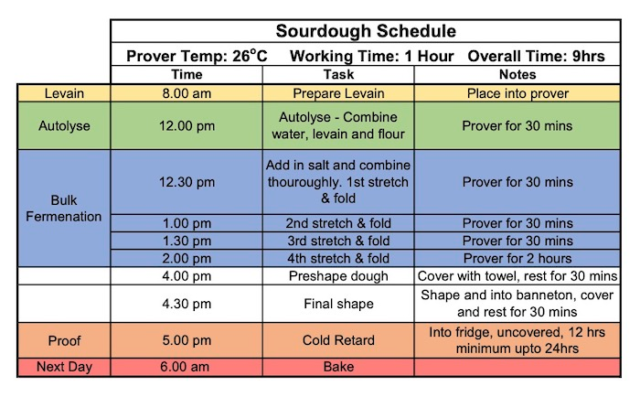
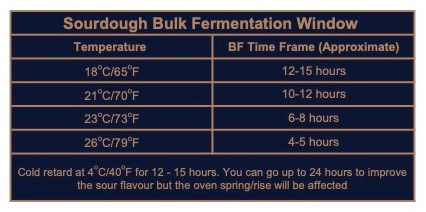
Sourdough Schedule and Bulk Fermentation Times
Below, I’ve provided tables outlining a typical Sourdough Schedule and approximate Bulk Fermentation Times, particularly useful if you don’t have a controlled environment.
All The Equipment You Need
- Bread Prover – This is how I made my bread prover for under £50: ‘My Homemade Dough Prover: The Key to Consistent Bakes’
- Mixing Bowl
- Kilner Jar
- Banneton or 2lb Loaf Tin – A banneton (proofing basket) is traditionally used for sourdough. Its primary purpose is to provide support for the dough during its final proof, helping it maintain its shape and encouraging a beautiful, taut surface. The basket’s pattern also imparts an attractive spiral design onto the loaf. While I appreciate bannetons, I often make use of what’s readily available in my kitchen; a 2lb loaf tin, when generously lined with a floured tea towel, serves the same crucial purpose of supporting the dough effectively during its final rise.
- Bread Lame – A bread lame (pronounced “lahm”) is a small, sharp blade, typically a razor blade, used for scoring or slashing the surface of your dough just before baking. This seemingly simple step is vital: it allows for controlled expansion during the oven spring, directs where the crust will crack, helps release steam, and creates those beautiful, characteristic patterns on your finished loaf. A sharp blade ensures a clean cut, which is key for both aesthetics and optimal rise.
- Dough Scraper – A plastic or metal scraper will work fine
- Spray Bottle
Storing Your Sourdough Loaf
Sourdough is best kept at room temperature in a paper or linen bag allowing it to breathe and retain moisture. For longer storage, preslice and freeze with baking paper between the slices.
To freeze an entire loaf, wrap in cling film, then into a freezer bag for up to 3 months. Reheat at 160℃ (320℉), sprinkle water on the loaf to get the crisp crust.
Avoid storing in the fridge as it drys out the loaf quickly.

Classic Crusty Sourdough Loaf
Ingredients
Equipment
Method
- Set the bread prover to 26℃ (79℉)
- Mix starter, flour and water together until lump free. Transfer to the kilner jar and seal shut. Place into bread prover for 4 hours.2

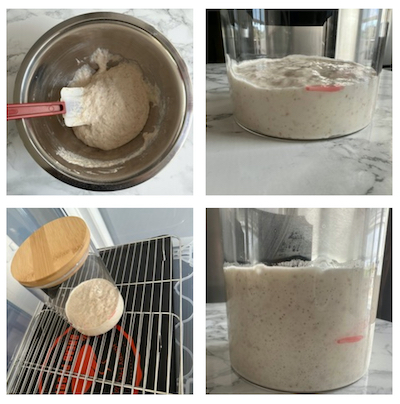
- As soon as the levain is ready, dissolve it in the water and add to the flour. Mix until you have a scraggly dough. Cover with cling film (I use a shower cap) and into the prover for 30 minutes.3

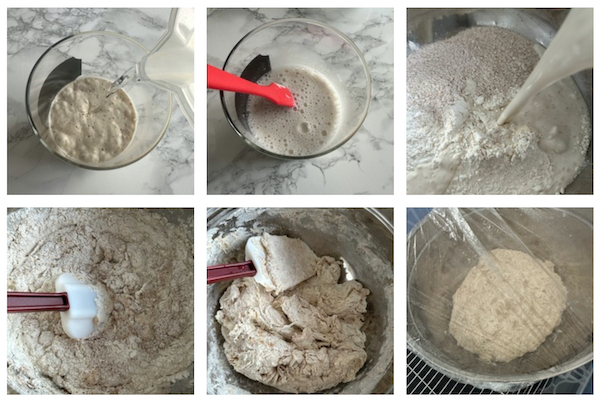
- Add the salt to the dough and mix thoroughly by squeezing the dough between your fingers for 2 minutes. Pinch a corner of the dough, stretch outwards and fold over onto itself to the centre of the dough. Continue to do this working your way around the dough to form a ball. Gently turn over so the folds are at the bottom, cover and back into the prover for 30 minutes.4

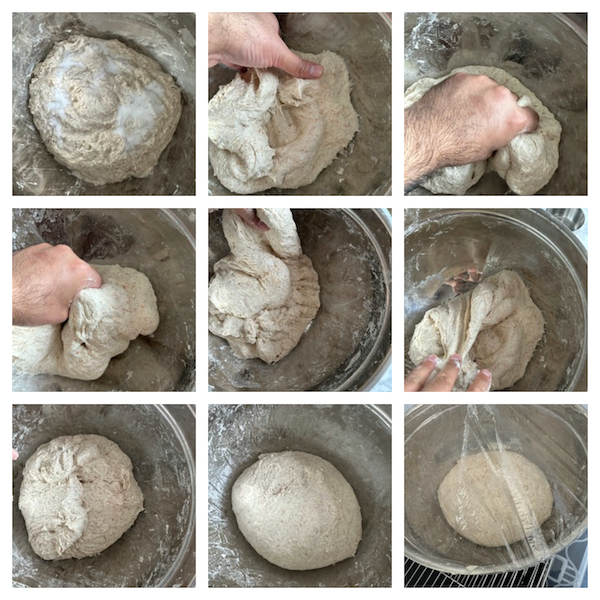
- Repeat as you did for the first stretch & fold (minus the salt). Rest for 30 minutes between each stretch. You should fine the dough stretches easier each time. After the 4th stretch and fold leave the dough covered and in the prover for 1 hour.5
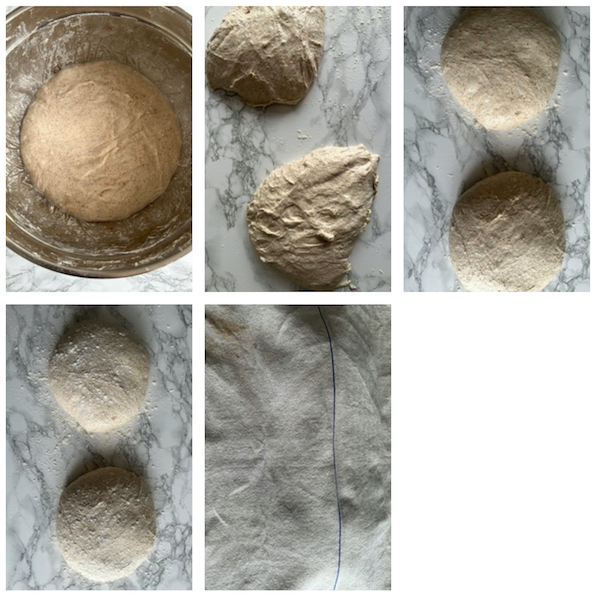
- Turn dough out onto a lightly floured work surface. Divide the dough in half, as you did with the stretch and folds, form 2 balls. Lightly flour the tops and cover with a tea towel for 30 minutes.

- Prepare a large bowl or plastic tub with rice flour. If using a loaf tin, line with a tea towel. With a Banneton light dust with rice flour using a sieve.
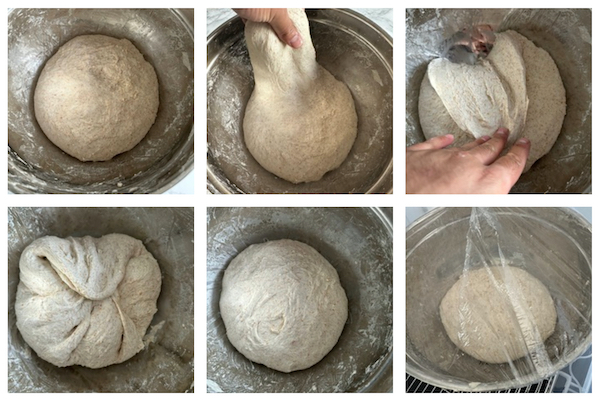
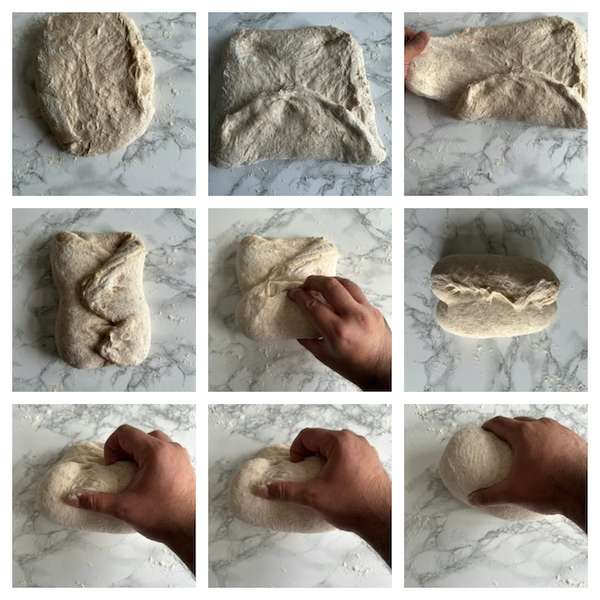
- Flip the the dough over and gently stretch the dough from the corners so you have a vertical rectangle. From the bottom (closest to you) lightly stretch and fold towards the centre, repeat for the sides, the dough should resemble an open tortilla wrap. Roll the dough from the bottom towards the open end, rotate 90° and roll again. Pinch the dough to create a seal where the dough meets and on the sides, you now have a doughrrito!6&7
- Gently roll the dough in rice flour and place into your banneton seem side up. Cover and rest for 30 minutes.

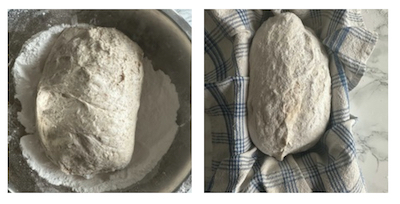
- After 30 minutes have elapsed, check the dough, you may need to stitch the dough slightly if the seam has opened. Working from the bottom, up, pinch the dough just right of the centre line and stretch and seal left of centre. Work your way up alternating side so you create a cross stitch.
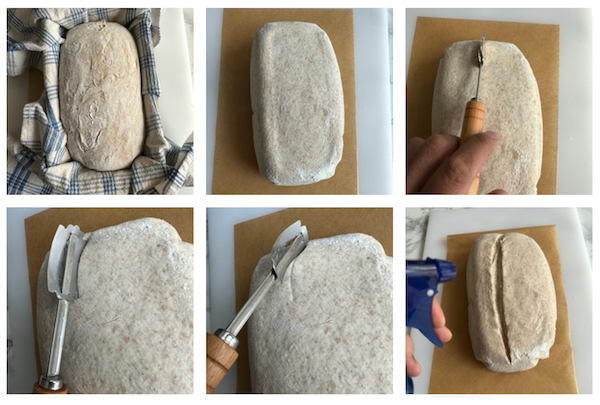
- Place the dough in the fridge uncovered for 12 hours.8&9
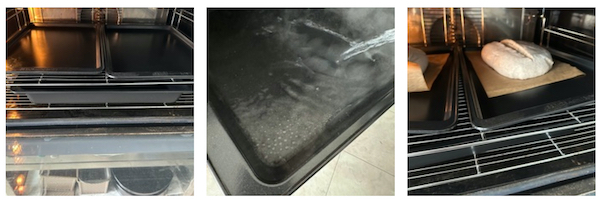
- Preheat your oven to 230℃ (445℉) with a baking tray on the middle shelf and a deep roasting tray on the bottom. Boil water and have at the ready.
- Tear a piece off baking paper just slightly larger than the dough, place on a chopping board (this is going to make it easier to transfer the dough into the oven). Turn the dough out onto the paper. With a bread lame, just off centre either to the left or right score the dough half inch deep. Spritz the surface of the dough with water.10

- Transfer the dough on the baking tray in the oven and fill the bottom tray with the boiled water. Bake for 20 minutes then remove the water tray, turn oven down to 220℃ (430℉) bake for another 15 minutes.115 Minutes into the bake I like to go back in and score again under the ear of the loaf to guarantee a good expansion and get that prominent ear.

- Leave to cool on the tray for an hour or 2 before cutting into the dough. I know, it's going to be hard to resist cutting straight into it!
Notes
- The time frames indicated will vary depending on specific conditions, temperature, levain strength and humidity, they are merely a guideline. Through practice you will understand what to look for in each stage to know when to move to the next. I will give you my indications to give you a head start.
- Mark a line or with a rubber around the glass to know the level where the levain started. You are looking for the levain to have doubled in size and hit the peak. As the levain rises, the surface will be slightly domed and bubbly, when the surface is flat and you see it just start to collapse, levain has reached peak and ready to use.
- Shower caps are cheap and reusable, ideal for this recipe since we are going in and out of the mixing bowl.
- Keep a bowl of water with you to dip your fingers in when doing stretch and folds. Depending on hydration the dough will most likely be sticky, the water barrier on your finger will prevent clumps of dough sticking and tearing off.
- As you go through each stage of Stretch & Folds, you should see the dough volume increase and the elasticity improve. It is vital to turn the dough over after S&F's to trap the carbon dioxide gases produced and for the dough to rise.
- Each time you handle the dough you want to be gentle, understand the limitations of the dough at each stage and work along with it. When it comes to stretching the dough for final shape, stretch as far as the dough will allow. Don't force it, you will tear and knock all the air out.
- To get a good shape, as you roll, try to tuck the dough in on itself, you will feel it tighten and form smoother. You know you have shaped correctly when the the dough holds its shape free form and has a bouncy jiggle when you shake it.
- Leaving the dough uncovered will cause a skin to form, WE WANT THIS! The dough will continue to ferment in the fridge (at a slower rate) but the skin will keep that controlled and stop the dough from rising any more, trapping all the gases in. Plus allow for ease to handle when baking.
- The duration of cold retarding will contribute to the flavour of your dough. Minimum 12 hours is what I recommend to allow the dough to do exactly what it needs in order to get a good oven spring. The longer the dough ferments the more sour flavour is developed, I normally cold ferment 12-15 hours and get a good flavour and oven spring. I have tested up 24 hours and not had any issues. However, I have know for people to go as far as 48 hours and get great results, but oven spring is slightly compromised.
- Scoring the dough, you need a good sharp blade on the bread lame or knife. Slightly right or left of the centre line put the blade edge flat against the dough. Lift to a 45° angle so the first 1/4 of the blade tip is pressing into the dough. Confidently, drag down the loaf to create your score.
- Move quickly so as not to let the oven temperature drop too much.